
Inkscape Tips for SVG Success 🏆
Learning a new design program can be a bit overwhelming, but I promise you will be amazed at how easy and fast these first designs are to make!
✨ Supplies for Projects
⇢ Acrylic or Coated MDF
⇢ Clamps or Binder Clips
⇢ Ribbon
⇢ Adhesive
✨ File Downloads for this Project
⇢ Legend of Zelda : Link to the Past Hyrule Map Laser Cut File
How to Contour, Embed & Layer Your Own SVG Laser Cut Files with Inkscape
I am going to teach you the basic Inkscape functions you need to know how to Contour, Embed & Layer your very own svg laser files!
Let’s jump in!
Project 1 – Contouring & Embedded Shapes
I was feeling some Halloweey vibes, so lets make a Moon Phase Decoration!
Let’s start with a circle. If you hold the control button (CNTL) while you drag out a circle, it will make it a perfect circle. Then we CNTL C to copy and CNTL V to paste. We’ll need 3 circles.

Then overlap these 2 to make a moon shape. Use the alignment tool to make sure they are straight across and Path->Difference to make a moon.

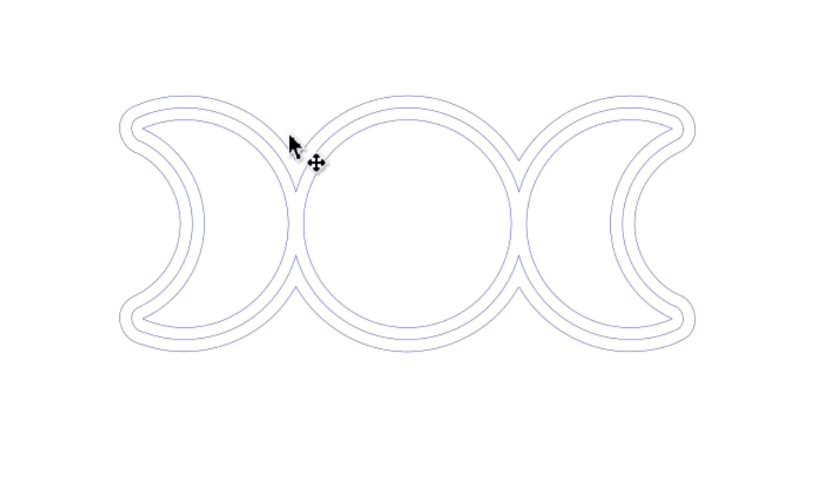
Now copy and paste another crescent moon shape. The little triangle at the top of the screen will flip it around. Now we just need to arrange these and use the alignment options to make them even and distribute them.

Great! Now select everything and do CNTL D to duplicate everything. This is like copy and paste, but it’s right on top of itself. Now select them one by one and do this. Press CTRL then the + key and this parenthesis ).

Keep tapping the parenthesis until it is outlined as far out as you like. The opposite parenthesis ( will shrink this contour and start to contour inside your shape! Options!
This function is also under the Path dropdown under Inset and Outset, but these hot key shortcuts are great to know!

Once you are good with the outline width, go to Path -> Union to make these all one shape.
Now I just select and CTRL D, duplicate this outline and we CTRL + ) another contour to the one we just made. This is all we need!
So, we have this for our back layer. This will be the outline layer. And we copy and paste the original moons for the embedded layer. If we cut these with 3 colors, it is going to look awesome!

I have a little tip that will save you material, so let’s start by cutting out 2 of the back layer. I am doing a matte black 3mm acrylic.
Using this pretty glitter purple, I cut out one layer of the contoured moons. I’m going to hold onto all the pieces and cut this same design out of another cool swirly color I got from Craft Closet. I’m a huge fan of theirs, I have a link for them below, they have a huge selection of co2 and diode compatible materials!
I’m sure you’ve figured out why I cut 2 backs, that’s right, I’m going to repurpose the inside bits for 2 variations of this design.

Using some Weld-On to combine all the layers, they are done in no time! Simple-yes! But so pretty! I just glued on some ribbon in the back and they are ready to decorate your space!

Project 2 – Contouring & Embedded Shapes
Let’s go over how to make shapes fit snugly together.
This will be just 2 colors. First, I just write in the word Subscribe and make sure the font is set to something I like.

I draw a rectangle around it. We can round out the edges with this little toggle.

Now, to make the text with a cut line, hold shift and select a color down in this color bar.

Great! Now I am going to make a little clicky hand with some more roundy rectangles. Using the Path->Union function, it welds them all together. I alter the nodes a little to make it perfect.

Using what we already learned, let’s contour this a little bit so I can engrave an outline. To color in between just these 2 lines, select them both and Path-> Difference.

Now you can click the black color button down below and it will just fill in where we want.
Make sure you copy a cut line for around the hand, otherwise if you add a cutline to this shape, it will cut the outside and inside.

To hold all these elements together, do CTRL G to group or select everything and go to Object -> Group.
Almost done! First I make the line width the thickness I need. Next, I position the hand to where I like, then I make a few copies. To create the final cut lines, select all this and go to Path->Union. We don’t need the words and hand outline, so let’s delete that.

Next shape needs the letters and a cutout of the hand. Select the oval and hand, then go to Path->Difference.

We keep one hand on it’s own. I placed it next to this shape, because they will be cut out the same color. Let’s get them cut out!

I used this color coated MDF, which is super cheap and wildly colorful. Also from Craft Closet. I used some masking tape to keep all the letters together. We are going to need the bits inside the B’s and the R.
Using a bit of gorilla contact glue for this gets everything in place in no time! Tweezers are super helpful for those little teeny pieces.

These clamps from the dollar store keep it all in place as it dries. Now, I just need to figure out where to put this…

Introduction to Laser Design Club
So, now we can contour, embed, and layer! BUT!!
There is so much more to learn about inkscape, which is why you should check out Laser Design Club! They have videos about inkscape, and will soon feature 5 in depth tutorials from me, plus they have tons of downloads, supplier discounts, contests and giveaways… And, it’s just nice to have a community of us laser nerds. 💘
Watch the entire in-depth tutorial in the video below!
➕ Subscribe to my YouTube Channel HERE
🆓 FREE Download for Honeycomb Bed Pins

Leave a comment