
Save Money & Make Money! 💰
You bought a laser as an investment to make cool things and hopefully get your money back after you sell some awesome products. But material prices just keep going up and maybe you feel a little stuck on what to even make with your laser.
That’s where thrifting comes in! In the next few minutes, I plan to inspire you with some projects you can make with objects that you are very likely to find in a thrift store! Nothing too rare or weird! So let’s get that laser fired on and I’ll show you what I’m thrifting!
✨ Supplies for Projects
⇢ Hand Drill
⇢ Sawtooth Bulk Picture Hangers
⇢ Aleene’s Jewelry & Metal Glue
⇢ Goo Gone
⇢ Wide Masking Tape
⇢ Mod Podge
Upcycled Laser Engraved Upcycled Cigar Box Shelf

Cigar boxes are a staple find in thrift stores and they are great for engraving! Luckily, I was able to find a box that didn’t have too much of an embossed logo on the top.
These are fun to turn into cute storage, purses and all sorts of things, but I am going to think outside of the box and engrave the inside of the box. So, I guess I am thinking inside of the box. Well, anyway, I am going to make a shelf!
First, I just need to detach the top from the bottom so I can engrave the inside part of the top lid.

It has a stamp in here that I could sand away, but I am going to leave it. There is no lacquer on the inside, so engraving will be a smooth sailing process.
I am going with a Dia de los Muertos design, for the Day of the Dead. Now that we are encroaching Fall, I have the season on my mind.

Now, I just need to turn this into a shelf! I am going to screw the top to the bottom of the box since I had to rip the hinges of the back. To help me do this I am going to use a hand drill. If you don’t have one, it may surprise you how often you will use it for projects and for things around the house! Sometimes a big drill is just too much.

Next, I just screw the pieces together. If the hinges were still on here, I would skip this step and go on to the next one, which is to add some chain for support and flair. It is super easy to attach with tiny screws and that hand drill. I also put some hangers on the back and it is ready to hang up!

If you engrave it with a fun design this could make a cute shelf in a bathroom, or engrave your favorite recipe and hang it in the kitchen for your spices! So many profitable possibilities!
Turn an Old Leather Purse into Anything with Your Laser
Can you believe, I got this suede leather purse for only $5! There are so very many purses at thrift stores and a lot of them are real leather! This one is a little beat up and it definitely had a perfume bottle leak into it at some point, but think of how many things we can make with this!

I am going to make 2 things! When you are cutting up a purse, try to keep any hardware or straps it comes with, you never know when those will come in handy!
As with most leather crafts I do with my laser, the first thing that needs to happen is to soak your leather in water. This will clean it up a bit and help it cut evenly and a little bit less smelly.

Once it is saturated, I just towel it off and it is ready! Going suede side down, I am going to make these into some super cute coffin earrings! These are a version of coffin earrings from a new jewelry file I have available for download. Perfect for the spooky season!

To finish these up, I let them dry a little bit. There is a bit of residue along the edges and to easily get that off of there I use one of my buffing rags with a little bit of rubbing alcohol.
For the big, yet super lightweight coffins, I just need to hang them on some hooks and they are ready to be sold! That’s why leather makes such great jewelry, there is barely any finishing touches needed!
I am also going to use the little hearts from the center of the coffins to make stud earrings. This Aleene’s jewelry glue is my favorite glue for studs and does a great job securing tightly to leather.
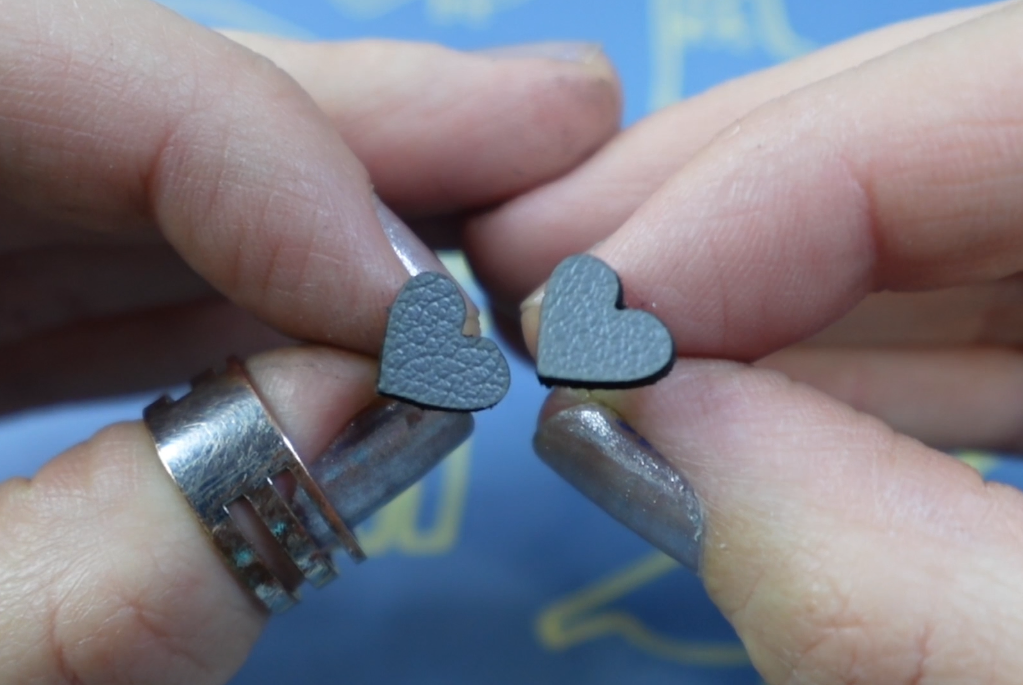
I could get so many pairs out of this purse! It’s way cheaper than buying new leather! Plus, a lot of people love upcycled, handmade goods. I know I do!

Upcycled Thrifted Glass Bottle Halloween Decoration
I’m sure if you have ever been to a thrift store, you know there are so many things in the bric-a-brac section! I found this old Crown Royal bottle and it is perfect for my Halloween-y idea!

I just needed to use some Goo-Gone to get the labels off. That stuff works miracles! Now I use my wide masking tape on the area I want to laser. I have a 40 watt laser, so I can just engrave right on here. Otherwise, you’ll need to use diode laser compatible marking paper.

I engraved a Jolly Roger, skull and crossbones, with a spooky looking Poison label on front as well as the back side of the bottle.

There is hardly any more to this project except to peel off the masking and fill it up with poison! Since I had just run out of my favorite spicy death juice, I filled the bottle up with some water and a few evil drops of food coloring. I promise it’s only food coloring, completely safe.

Any guesses as to what the weird leather oval thing was yet?
Upcycled Leather Oval Living Hinge Net Bag
I think the best way to tell you is to show you! But first, I get rid of the residue blowback marks just like we did with the coffin earrings with the rubbing alcohol. Once that is done and this thing has a bit of dry time, I am ready to show you!

Putting my spooky bottle of poison right in the middle, I just pull up the handles to reveal… a little leather net bag! It just hugs around the sides of the bottle!

How cute is that! And since we saved the strap from the purse, I can just loop that on and this poison is ready to hit the road! Or pretty much anything! If you go out for a night on the town, bring a pumpkin that a fairy godmother can turn into a carriage for you! No more Uber fees!

Upcycled Laser Cut Children’s Book Puzzle
Children’s books are probably one of the cheapest things you can get at a thrift store and I was lucky enough to get one of the most fun books of all time!

Now, I have to warn you, in order to do this project we will be taking pages out of this book! Don’t worry! The plan is to transform it into something kids and even me, will enjoy for ages!
I am turning one of these pages into a puzzle! To do that, we first need to flip through and find a page that we like. I love space, so let’s do this one. We just need to find Waldo first. There he is!

I am going to use a piece of ⅛ inch thick light MDF board as the backing. Using a utility knife, I cut the page out carefully. The best type of adhesive to glue these together is Mod Podge. I put a pretty thick coat on the MDF and carefully lay the page on top.

The page is going to soak up the moisture and wrinkle a bit. Once it wrinkles, I use some sort of squeegee or flat edge to lightly smooth it out. Then, it gets a coat of Mod Podge on top.

This needs to fully dry before we cut it. While it is drying, I’m going to let you in on a super awesome website that will generate puzzle svgs quickly and to your specifications.
I found this thread on the glowforge community, and thanks to this absolute boss, we have this app to generate puzzles for us.
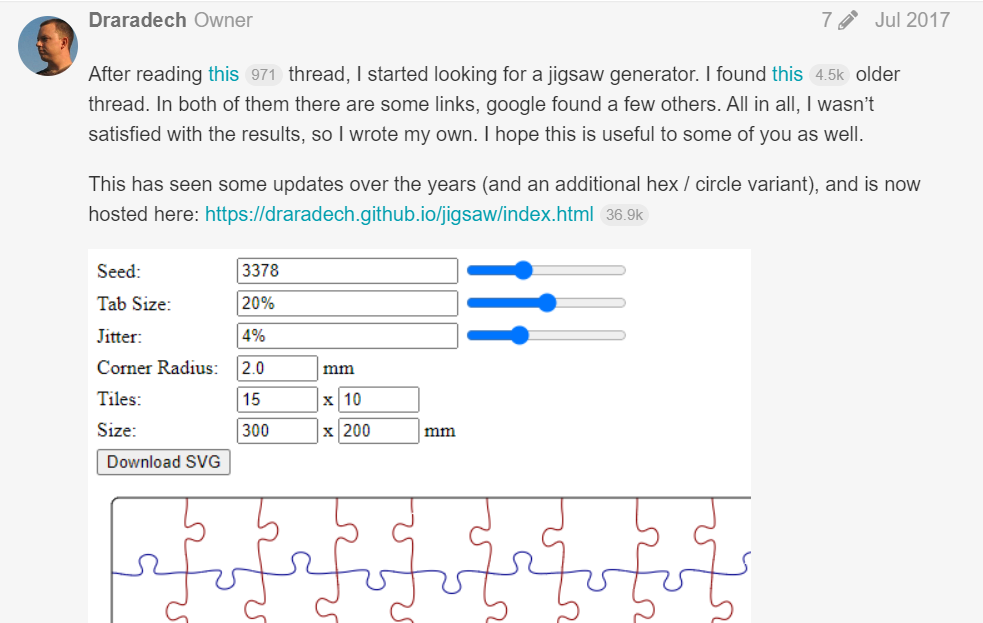
Here is a link to the App. You can toggle all the specifications you want. You can make it squiggly, adjust the tabs and how many pieces you want. Then you just download the svg and you are ready in less time it takes for the puzzle to dry!

Once dry and your puzzle file is made, you just cut it out! It takes a while, but it’s so worth it.
The most fun part is to put it together! It took me a little while, especially since I didn’t have a reference picture. Because this is laser cut, the pieces are a bit loose compared to stamp cut cardboard puzzles. Luckily, the thick MDF board holds everything together pretty well.

I cleaned this up with a bit of rubbing alcohol and since the Mod Podge is pretty thick, it just dried right back up again. This would obviously make a great puzzle to sell, but I think it would look really unique as a frame piece of art, too!

Conclusion:
It’s not just that laser-able materials are getting more expensive, but if you want to make unique, one of a kind pieces of art, you should take a moment at your local thrift store. You never know what you’ll find!
Watch the entire in-depth tutorial in the video below and get inspired!
➕ Subscribe to my YouTube Channel HERE
🆓 FREE Download for Honeycomb Bed Pins

Leave a comment