

The Profits are Astounding! 🤑
10 Free Downloads Await! Sign up for Creative Fabrica’s All Access Free Trial and enjoy 10 free downloads to kickstart your creative projects.
✨ Supplies for Project
⇢ Card Stock
✨ File Download
⇢ 3D Birthday Card Blank
My dad’s birthday is next week and what do you get a guy who has it all? A nice card, that’s what!

Have you ever considered using your laser for papercrafts? I highly suggest you do!
Finding a Free Card Design
I originally created this 3D Happy Birthday Card back in 2019 and now I am going to combine that with all the knowledge I have gained! So, let’s head over to Creative Fabrihttps://www.creativefabrica.com/ref/8694886/ca and see what’s what!

If you haven’t heard of CreativeFabrica.com yet, it is a website with millions of fonts, svg and image files you can download for a super good price. Will be searching for a cat themed birthday card among these 14,000 results.

I imported the svg into inkscape. Now we need to alter just a few things to make this really pop out.
Altering the Card Design for Your Laser
I just want to get rid of the words, since the inside of our card is going to say happy birthday.

Now, I need to re-center the kitty face, but multiple things seem to be grouped together. I first tried to select everything and right click on them to see if there is an “Ungroup” option. If there isn’t or it doesn’t seem to work, go up to Path and down to Break Apart with everything selected.

Then, I held shift and selected the red color in the color bar on the bottom to make the line visible again. Now I can center my kitty face!
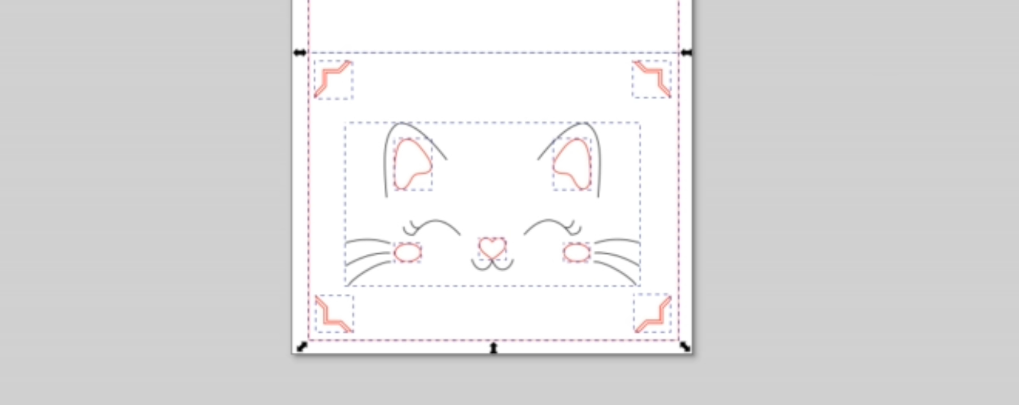
This middle solid line will need to be turned into a dotted line, so we’re not cutting the paper in half. To do that go to the Fill and Stroke option in the Object dropdown. Now that it is in our right sidebar, click over to the Stroke Style tab.
With the line selected, you can choose from a bunch of dots and dashes. You can alter it with the pattern input, as well.

Turning Lines into Solid Outlined Shapes to Cut
Now, the face lines are going to be too thin to see the fancy cardstock underneath, so let’s outline them.
I selected everything I wanted outlined and pressed CTRL + G to group them together so we can make an outline for all of them at the same time.
To do this neat trick go to Path Effects, you can find that under the Path drop down. Then in your right sidebar, select the plus (+) icon and select Join Type.

I like the line caps to be rounded. Then I fiddled with the line width until they looked the way I wanted. You may also need to fiddle with the Join dropdown, depending on your project.

If your shapes are coming up a solid color, try to select the red x box on the color bar to clear the color and Shift + a color to see the outline.
And, if you have some weird looking bits like this, Ungroup everything, select the objects you’d like to turn into one shape, then select Path and down to Union.

Time to Laser Cut the Cardstock Paper
Ok! Let’s Cut everything out for real this time! We are going to use super low power and very high speed. Run a test to find your levels and make sure you either tape down your paper or use magnets.
I cut out the outside of the card in a black card stock. I had some fancy scrapbooking paper for the window behind the cat face.

I also cut out the same size of the color paper to be seen through the previous 3D Happy Birthday design, which I cut out of a natural paper cardstock. So fancy. I also cut out a few cat shapes because I can’t seem to help myself.

Now, obviously we are just going to glue everything together, but I’m excited for you to see how it turned out!
Folding and Gluing this Masterpiece Together
All the dotted lines really help fold everything nicely. The hardest part is folding the 3D card. The bottom of “Birthday” folds forward, the top of the word goes backward. The bottom of the word “Happy” folds outward. I believe in you! You got this!

I glued everything together with a simple little glue stick, so the paper doesn’t warp. Those extra cat shapes are for the front of the Birthday platform because that is just asking for something! Little present shapes, dogs, unicorns – whatever!

I snuggled it in under some heavy objects so it could dry. And viola! Just like that, you have an awesome 3D, homemade, personalized card!

You’d be surprised how well paper crafts like these sell. Paper is cheap and the profits are high! Plus, you can laser cut felt, wood or leather elements to incorporate into your cards!
Are you making paper crafts with your laser? Because I think you should.
Check out my other laser tips and Inkscape tutorials!
Sign up for Creative Fabrica’s All Access Free Trial and enjoy 10 free downloads to kickstart your creative projects. Plus they’re having a Subscription Sale, so check it out and Happy Crafting!
Watch the Full Tutorial in the video below!
➕ Subscribe to my YouTube Channel HERE

Leave a comment