

Christmas on a Budget! 🎄
Christmas is a great holiday to utilize our lasers for stocking stuffer gifts and holiday decorations! The best place to get some creative juices flowing is at the Dollar Tree!
✨ Dollar Store Supplies
⇢ Large Bottle Cap Sign Blank
⇢ Pack of 6 Wood Planks
⇢ Glass Plate
⇢ Clothes Hangers
⇢ Felt Multi-Pack
✨ Extra Materials Needed
⇢ Spray Paints
⇢ Rub n’ Buff
⇢ Hot Glue
✨ File Downloads for these Projects
Project 1 – Big Santa Soda Cap Decoration
When I saw this big Soda Cap wall hanger, I knew I had to get it! It felt like something I could turn into a retro styled decoration for my 50’s style diner kitchen!

I instantly thought of all the Santa advertisements Coca Cola does, so I went to Creative Fabrica to find a vintage Santa! It’s a great website to find downloads like these for a super low subscription.
Once I had my engraving image ready, the biggest step is to paint the bottle cap. I recommend giving it a bit of a wash before painting. Take time to let it completely dry in between coats.

Once dry, we can engrave it! I engraved it two times to make sure it obliterated the paint. Of course, make sure the hanging holes are aligned to your engraving file. There will be a light residue left over, but we will take care of that in the next step.

There are some fine detailed bits on here, so I really want to make those stand out. To remove the residue and make the metal shine through, all we need is some rubbing alcohol. I am using 70% rubbing alcohol with a microfiber cloth.

You don’t want to scrub it, or you may lose fine detail. In no time, the metal shines through and your decoration is done! It’s literally that easy!
You can experiment with other types of paint and embellish is more after engraving. As always, I encourage you to have a good ventilation system attached to your laser.

This sign fits right into my vintage kitchen!
Project 2 – DIY Laser Cut 3D Tree Stand Stocking Stuffer Gift
Once I saw a pack of 6 Wood Planks I had to get it. I instantly had the idea of designing a DIY 3D Christmas Tree Craft that would fit perfectly into stockings! Plus, 6 for a $1.25, that’s a bargain.

I have this Tree File as a Free Download! Even if you want to cut it out of a different material, you should try it out! It would work well with any 1/8th, or 3mm thick material. And if you need to alter the file to fit a different materials thickness, I have a tutorial going over that HERE.
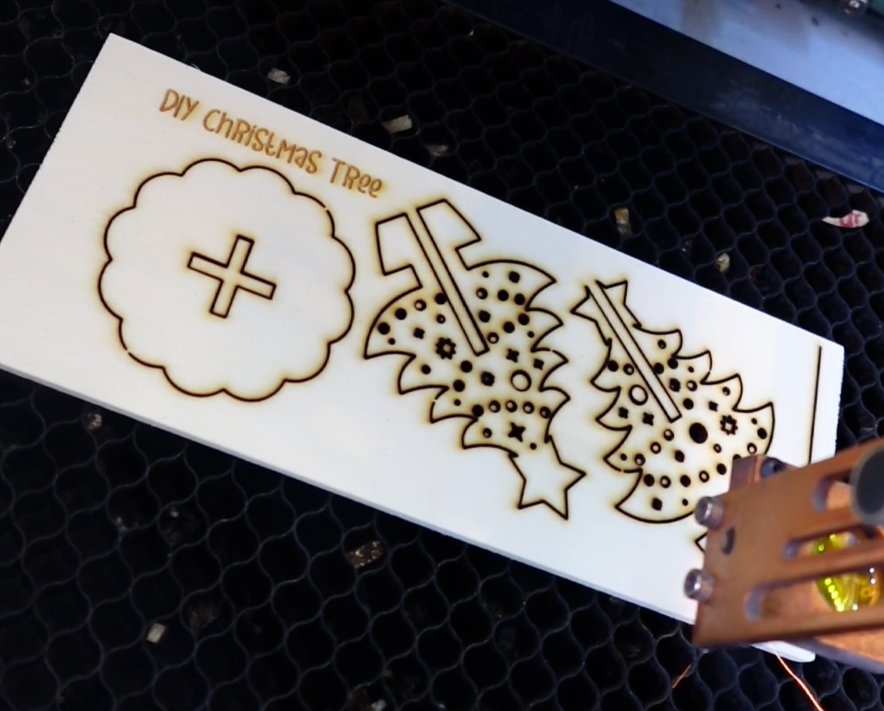
I made sure to have a little bit that isn’t cut so the shapes stay together and can easily be punched out. The tree just slips into itself and into the base.

Easy peasy Christmas squeezy! Your recipients can color these with paints, or even markers. It could become a fun family tradition!

Project 3 – Santa’s Special Cookies and Milk Snack Plate
I love engraving glass from the Dollar Tree. I bought a large sized glass plate with Santa in mind.

I wanted to make a Special Plate, just for Santa! Little kids would have so much fun getting out Santa’s special plate, year after year. I will also have this file as a free download for you! Tis the season, after all!

You can mask this before engraving. If you are using a diode laser, you will need to get the glass ready to etch with an engraving solution or special tapes.

After I centered it and engraved it, it could be pretty much done, but I wanted to give it a bit of the ol’ razz-ma-tazz!
I got rid of any residue from the engraving first. Now it is ready for some Rub n’ Buff! If you are planning on actually eating off this plate, I would skip this step. If it’s a “just for fun” plate for a Santa Decoration, I wouldn’t worry about it.

Just rub on a little bit and buff it out! It will stick to the etched areas. I was able to get it all buffed out with just a paper towel.

Now you can impress your littles with Santa’s very own plate! Of course, you’ll be impressing Santa as well. A few more presents never hurt! 🎅

Project 4 – Custom Name Clothespins
I had some clothespins left over from another project, but Dollar Tree seems to always have some in stock!
This time, we are going to make Custom Name Clothespins! But, to make sure they are aligned, I have made a clothespin template to be cut out of regular cardboard! And, of course, I have this as a free download, as well!

Pin or tape the cardboard down so it doesn’t move out of place. Do make sure to adjust your focus between the cardboard and clothespin height before engraving. If you can take apart your clothespins, they will probably engrave even more perfectly.

I love these because you can use them as a present label, to hang Christmas cards or even little stockings! Speaking of stockings!

Project 5 – Laser Cut Felt Stockings for Cat Toys or Gift Cards
Of course I needed to pick up some more felt sheets! It is perfect for the laser because it cuts in no time and the edges seal up from the heat!

We are going to make little stockings! Plus, this download is also available for free!
This set of felt didn’t have white, but I had some leftover from another project. I laser cut out all the little stocking shapes keeping the sheets in place with magnets.

I also cut out the name for one each for my kitties.

Now to glue all these together, I find the fastest method is simply hot glue.

I’m gluing all around mine because I’m going to stuff them with a bell and some catnip I grew over the summer. I grew a lot of catnip. It must be some good stuff, as I was slowing becoming surrounded as I made these.

These little stockings would also be great as a gift card or cash holder, also!
There are a lot of laser crafts you can do with items from the Dollar Tree, you just need a little inspiration!
The dollar tree is a pretty great place to find cheap materials and supplies! If you would like some more inspiration on the cheap, check out this post next!
➕ Subscribe to my YouTube Channel HERE

Leave a comment