
Level Up Your Inkscape Skills & Laser Game! 🏆
10 Free Downloads Await! Sign up for Creative Fabrica’s All Access Free Trial and enjoy 10 free downloads to kickstart your creative projects.
✨ Supplies for Project
⇢ Acrylic or Wood
⇢ Weld-On Acrylic Cement
⇢ Novus Plastic Polish
⇢ Gorilla Duct Tape
If you have an image you want to turn into a laser-able object in Inkscape, this tutorial is for you! Find an image you want to turn into some jewelry, wall art or other project and follow along these steps!
Step 1 – Get to Know the Basic Inkscape Functions Needed.
These are the main 3 functions we will be using the most, so get used to them.
- DUPLICATE – Select Objects and hold CTRL and press D. (CTRL + D)
Similar to copy and paste, Duplicating objects will make a copy in the same location as the object. You can then select the object and move it. - LINE COLOR SELECT – Select Object and hold SHIFT and click on a color square on the bottom of the window. (SHIFT + [COLOR])
This will be helpful to organize our shapes and objects when we are making the file. - DIFFERENCE – Select 2 Objects and go up to the Path Dropdown Menu and select Difference – OR – Select 2 Objects and hold CTRL and then press – (the minus symbol) (CTRL + -)
Once you master this function, we will be able to cut out shapes that will fit together perfectly after you laser cut them.
There are hot keys and short cuts for everything, but stick to what you are most comfortable with.
Step 2 – Plan Your Design Colors, Cut Shape and Engraved Areas Ahead
I am going to be making this Patrick Star coloring page into a pin. To plan out what each element is going to be made of, I literally color it in!

I also plan which elements are going to be engraved, as opposed to cut out of an acrylic. I also plan on anything that needs to be moved, or removed from the final look and feel of the piece.
This help me to visualize how this needs to be designed, which will save time in the long run.
Step 3 – Import Image and Trace Bitmap
Now, let’s import this coloring page into Inkscape.
Like many images like these, they are not great quality. This one is a bit blurry around the edges, but so long as it is a rather stark black and white image, this program will be able to trace it.
To do that, select your image and go up to Path -> Trace Bitmap. There will be a popup on the right side tool bar. Here you can mess around with the controls to smooth out edges and make it look the way you like.

Once it looks good, click apply and it will generate your new vector image! as you can see, it it just the black outline of our friend Patrick here. And, boy, does it look so much better than the jpeg coloring page!
Now, if I wanted to engrave this image onto something, all I would need to do is outline it with a cut line and laser it out! You could then paint it, or perhaps engrave it onto some clear acrylic.
But, since we are going to make this into it’s own multi-color design, let’s get to fiddling!
Step 4 – Breaking the Vector into Cut Lines
The “Trace Bitmap” function essentially traced around all the black in the image which means it has a line on the outside and inside of all these elements. We don’t want that, we just want one cut line for our laser.
To do that, select the image and go up to Path -> Break Apart.

Let’s clear out all the color by keeping things selected and clicking the white box with the red x in your color bar. To make the lines show up, now hold Shift and select a color.

It really won’t matter what things are colored during this whole phase.
We don’t need this outline, so let’s delete that. Patrick looks weird, I know. I guess he always looks a little silly, but now we are going to fix that next.

Step 5 – Making the Shapes all Fit Together
The Eyes
The only things I will need to replace with new shapes are his eyes. It’s easier to make new ovals than to try to smooth these ones out. This will be exactly like our exorcise at the start.
I very simply draw an oval and place it on top of the old eye to make sure it’s about the same size and angle. I made it red to keep things easy and made a duplicate. Once everything is in the place I want for his eyeballs I go through these steps:
- Select them
- Do CTRL + D to Duplicate
- Change the color of the lines with Shift + [Color]
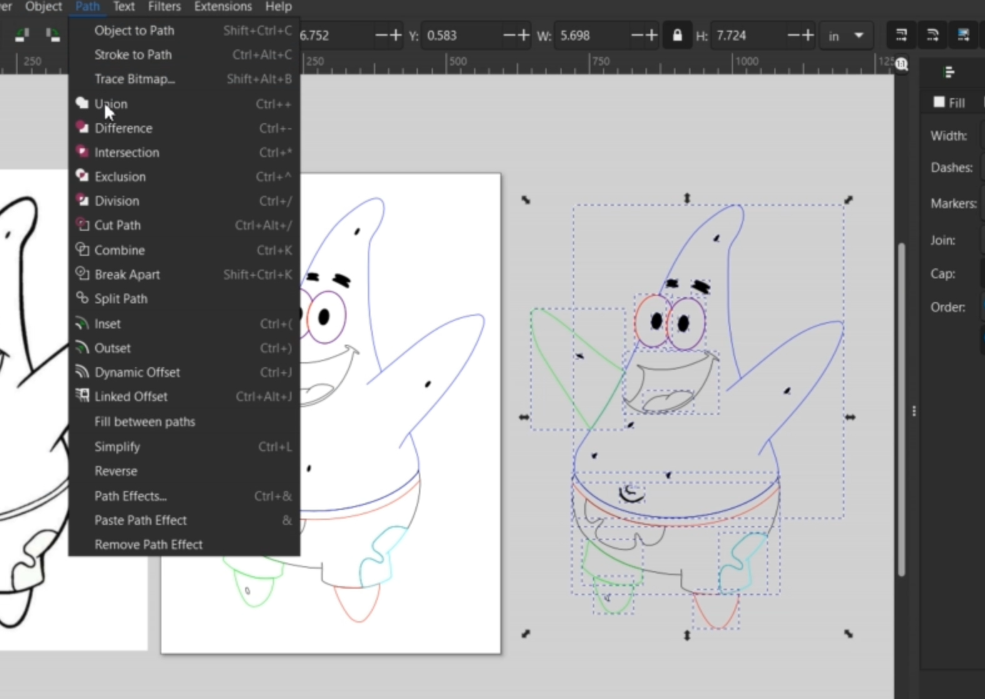
- Go up to Path -> Difference
Reminder: The very last shape that is drawn or duplicated becomes the “cookie cutter” into the previously made shape.
Once I have the eyes cut out the way I need them, I need to make the ovals for inside the eyes. When everything is placed, I put them where they eyes go and delete the old ones.

Now, here’s where it gets weird, so pay attention!
The way I want this laser cut it so the eyes fit right into his head, so we need to fix all this space from the previous outline the tracing made.
Double click the head lines and it will bring up these nodes. you can move them around and smooth things out.

I am deleting a bunch and making it go straight through the eyes. This is no problem because we are going to duplicate the eyes and use them to cut into the head for a snug fit.
If your nodes are round when they need to be straight or straight when they need to curve try out these node buttons on your top toolbar.

I also smoothed out what was left of that eyebrow shape, we’ll deal with that soon enough.

I went ahead and made a blue duplicate of the head. To make the eyes cut into the head shape, I first selected both and made a blue duplicate. To make both eyes one cookie cutter, I made sure both new blue eyes are selected and went up to Path -> Union.
Then I selected the eyes and the blue head outline and up to Path -> Difference we go! I know it worked when the old black outline is seen through the eyes. I delete that and we’re off!

I plan on engraving the eyebrows, so I make a duplicate and fiddle those into a place that looks good. I fill those, his belly button, spots and the eyes in with black to be engraved later.
Arms & Legs
Now let’s get this arm in place! I double clicked on it and moved the nodes to overlap the head. It doesn’t need to be perfect, they just need to overlap.

I also altered some of the nodes so it is a smoother shape. Once I was happy with the shape, I selected it and the face/body, made a copy (CTRL + D) and made it green. Next step is Path -> Difference. I delete the old black line and that’s done! When it is lasered out, it will fit right in place.

Let’s go ahead and do that process over and over for the legs and shorts. I skipped the right leg since there are two shape above it, we’ll get to that soon.

Now let’s make some cut line details. Patrick’s arm needs these lines but I don’t want this much material cut out.

So, I am going to double click it to bring up the nodes and pick a node I want to delete, but instead, I go up to the node function buttons and select “Break Paths at Selected Nodes” button.

Now, you can see this line is no longer connected, so I can delete the ones I want and leave what I need. Now when this is lasered out, it will just have a line cut into it, keeping the aesthetic of the original design.

Shorts
I want his shorts 2 colors, so lets make them! To this flower shape, we are going to treat it like the arm and leg. I smoothed out the cookie cutter side and overlapped the flower, made a copy, make those blue and did Difference. I also altered this creases in his short just like his arm lines.

Lucky for us, his little right leg is a simple enough shape to be able to manually alter to fit below his shorts.

I now make give the waistband the “overlap, copy and cut out” treatment. This conveniently leaves us with that other flower shape ready to go.

To make the band of his shorts, I use the “Draw Bezier Curves and Lines” Pen in the left tool bar and nudge it in place.

Believe it or not! We are almost done!
Mouth
To complete the mouth, I smooth out the tongue and give it the same treatment as that arms and creases, as well as smoothing out some of the nodes.
We’ll need the tongue piece to cut out of red acrylic as well as the place inside the mouth cut out. I filled the mouth engraving area black and made a copy of the tongue and placed it where it needs be cut out. Perfect!

Now we just need something to glue all these pieces to!
Backside Outline Piece
Make sure all the arms, legs, shorts and eyes are in place, select everything and make a copy. Move the copy into it’s own space and while everything is selected, go up to Path -> Union.
I cleared out the black fill and made the line red.
This method might not be a perfect outline, so Path -> Break Apart and delete anything in the middle of the outline.
If you were to need a hole to hang this off of something, you could do that now. Since, I am making mine a pin, it’s fine the way it is!

Organize the Components
All of our pieces are ready, we just need to sort them out. I made sure to keep things together that will be cut out of the same color. This is also a good time to make sure your cut and engrave lines, as well as, engraved areas are ready for your laser. Double check everything is the right size, and be sure to scale all pieces together so they fit.

Assembly
I have many videos and blog posts on how to assemble things. For this project, I am using gorilla duct tape to help remove the paper backing.
I then glue this altogether with Weld-On Solvent Cement. You want to use caution with this toxic chemical. I like using a large upholstery needle to move the solvent in-between my layers.

To accentuate the engraved areas, I will color those in with these Sharpie Paint Pens.

Once that is all dry, it’s time for the reveal! Using that tape, I peel everything off! I just need to clean up some of the paint with some Novus Plastic Polish solution.
This prototype came out pretty good! I might go back in and enlarge the eyes a little to accommodate the kerf and little things, but that’s all part of the process!

What do you think? Are you going to try it?
It may seem like a lot, but trust me in no time, you will have this mastered and have found out new ways to do it even faster. There is always way more than one way to achieve the same result on Inkscape.
Check out my other laser tips and Inkscape tutorials!
Happy crafting!

Sign up for Creative Fabrica’s All Access Free Trial and enjoy 10 free downloads to kickstart your creative projects. Plus they’re having a Subscription Sale, so check it out and Happy Crafting!
Watch the Full Tutorial in the video below!
➕ Subscribe to my YouTube Channel HERE

Leave a comment