
Spend a Dollar, Make a Dollar 💲
It’s nearly summer and the sun is shining, craft shows are blooming and it’s time to make some money! So, let’s head over to the Dollar Tree and see what we can transform into some profitable laser projects!
✨ Dollar Store Supplies
⇢ Boat Wheel Wood Blank
⇢ Jute Cord
⇢ Glass Cutting Board
⇢ Wood Treasure Box
⇢ Galvanized Metal Cloud Hanging
⇢ Glass Label Jar with Lid
✨ Extra Materials Needed
⇢ 3mm Acrylic
⇢ 3mm Wood
⇢ Clear Adhesive
⇢ Spray Paint
⇢ Swatch of Felt
⇢ Hot Glue Gun / Glue Sticks
✨ File Downloads for these Projects
⇢ Cloud Shelf Download
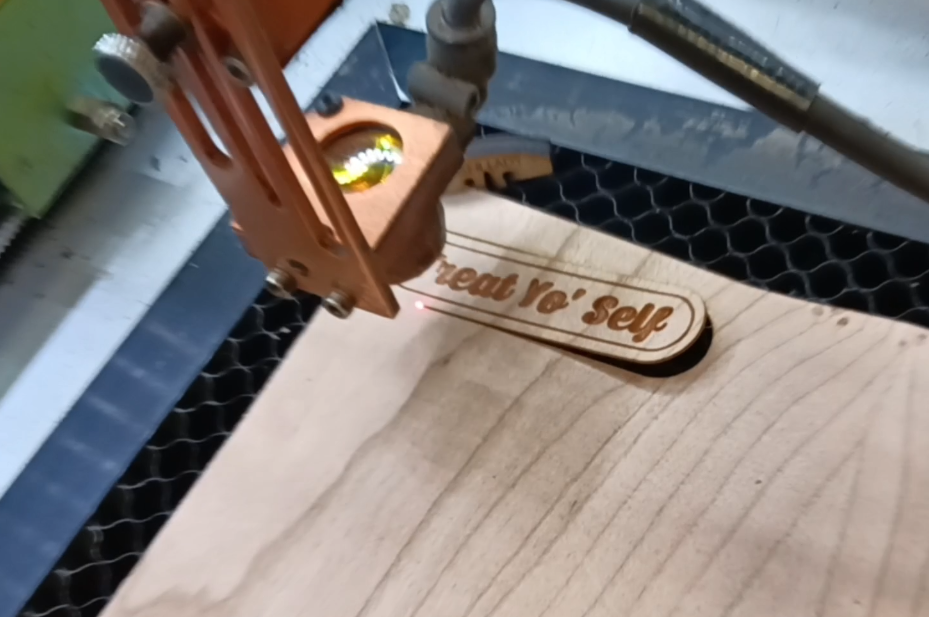
⇢ Zelda Box, Charcuterie Cutting Board & Treat Yo’ Self Download
⇢ Ahoy Boat Wheel Download
First, Let’s Paint!
Let’s start with the things I’m going to spray paint. I’ll need an ocean breeze teal for the boat wheel and plain glossy white for the metal cloud. First, I need to take the string and tag off this galvanized cloud and give it a bit of a cleaning with a window cleaner. I need to take the tag off the helm, boat steering wheel, also. Now they are ready to paint!

One light coat is enough for both, and I painted both sides, as well.

Galvanized Metal Cloud Shelf Craft
While it was drying, I put together this fun floral design. I used some honeycomb bed pins to hold it in place and lightly etched out the design. All we’re doing is taking away the paint to show the metal color underneath.

I am going to turn this into a little shelf, so I also cut out some sparkley glitter acrylic. One thin piece as a support and one shelf piece.

Using some of this gorilla glue, or e-6000 or whichever clear adhesive you like, I put on a thin layer and use these dollar store clamps to hold it in place. I used the same glue for the shelf and utilized this cup to hold it in place while it all dries.

I’ve had some lunch during my dry time and it is on there pretty good. I had this dollar store yarn hanging around. I did put holes in the shelf part to give it more elements, so I thread the yarn through everything to see how it looks. It is cute, but I want it to hang without stretching the string, so I switched that out for a chain. It’s completely optional. Ribbon would probably be super cute, too!

Wooden Treasure Box Laser Craft
Now for a quick one that you can charge a good amount for! I was so happy to see that the Dollar Tree had these little wooden treasure boxes! I used to do primarily nerdy events, so I am putting a Legend of Zelda design on the lid and the front side of the box.

If you take off the clasp, you could laser each side of this!

There are a lot of ways to finish this up. If I had some wood varnish, you could really make the engraving pop out like on this one I did some years ago. So cute! Just be sure to glue in a piece of felt on the inside. That really takes it up a notch!
Glass Cutting Board
Before we get into my very favorite and profitable craft, let’s do this super quick one that doesn’t need any finishing steps.
I am a huge fan of selling cutting boards! We did a bamboo one in the last dollar tree video, and this time I found a textured glass one! The bottom side is smooth, so I made a cute design and reversed the image.

It’s really just as easy as engraving it and you are done! If there are little sharp bits that poke out, I like to wipe those away with a cloth. I kept the little rubber feet on there, so one accidentally got engraved. That can easily be replaced. Depending on the size of your design, you can take these little adhesive nubs off before it goes in your laser.

Captains Wheel Dollar Tree Helm Laser Craft
Next up, we’ve got my favorite design today, the Captain’s Wheel decoration! If you are wondering why I’d buy a piece of wood like this when we could just laser it out, you’ve got to remember, this was only $1.25! If you are making a lot of things for a craft show, time optimization is key! To make this piece really stand out, I am going to engrave little anchors onto this helm. Since it is a bit big, I am using super fast settings and low resolution for my laser program, to save on time.

There are just a few elements we are going to add. Using solid walnut wood, I cut out the word Ahoy and in some other scrap wood, I cut out some little circles and an anchor. The circles will make sense soon.
I think the anchor is going to be cute in a white color. And, I am going to make the wood grain pop out with a clear paint. Either of these could also be painted by hand, if that’s your thing!

To finish this up, you’ll need some glue, scissors, the wheel (obviously) and some of this jute cord that I got at the dollar tree. Taking some glue and a bit of the string, I am going to wrap a few times around each of these sticky out bits. Hot glue makes this pretty quick. It’s coming along!

Now it’s time to find out what those circles are for. Since we have such great textures going on, I want to raise up the Ahoy word piece to give the whole thing a bit more depth. I just want to make sure that they are placed where I can glue them to the wheel.

Wood glue would work well for this, but I’ll just stick to hot glue. I carefully stick them together and we are almost done! I glue on the anchor straight to the wheel, so now we have 3 layers going on.
To hang it up, I just cut a bit of the string, tie it, and loop it through the hole and itself to make a more substantial looking hanger than just looping one piece through. If you know any sailors knots, this would be the decoration to incorporate them into!

This is so cute. Perfect for summer decorating! It only cost just a few bucks, including the paint and extra wood. How much would you sell this for? Or would you just keep it?
Candy Jar Quick Craft
Talking about things to keep, I have one more super duper fast project.

All you need is one of these little jars and some adhesive wood veneer. This material is such a great hack for making stunning decorations quick and easy. Even easier if you’d like to buy the designs from this video.
Once it is done engraving and cutting out, you just peel off the backing and put it in the little groovy space. Of course I will be filling mine with chocolate.

Watch the full tutorial in the video below! Don’t forget to let me know how much you would sell these in the comments! What crafts do you like to sell from the Dollar Tree?
➕ Subscribe to my YouTube Channel HERE
🆓 FREE Download for Honeycomb Bed Pins

Leave a comment